Bots
Bots are users that run automated tasks. To add a bot, click the 'Add Bot' button from the 'Bots' tab of the user management screen. From here you can also pause and start bots by clicking the relevant option on the far right of the screen. To edit an existing bot, first pause it and then click the bot name to go to the edit screen. The number of bots you can create is determined by how many bot user licences your organisation has purchased, you can check this from the licencing tab of the 'Settings' > Organisations and Divisions' option accessible via the cog icon at the top of the screen.
The following bot types are currently available, more will be added:
Email Extraction
This Bot type creates a unique email address which will be automatically monitored and any emails that are received will have their attachments automatically read by the UniFi AI service and then used to initiate a transaction within UniFi.
For the bot to work effectively you must first have associated a machine learning service with the app being used and added an AI service to the individual fields. Once you have successfully tested this by manually uploading documents you can then begin calling it automatically via a bot.
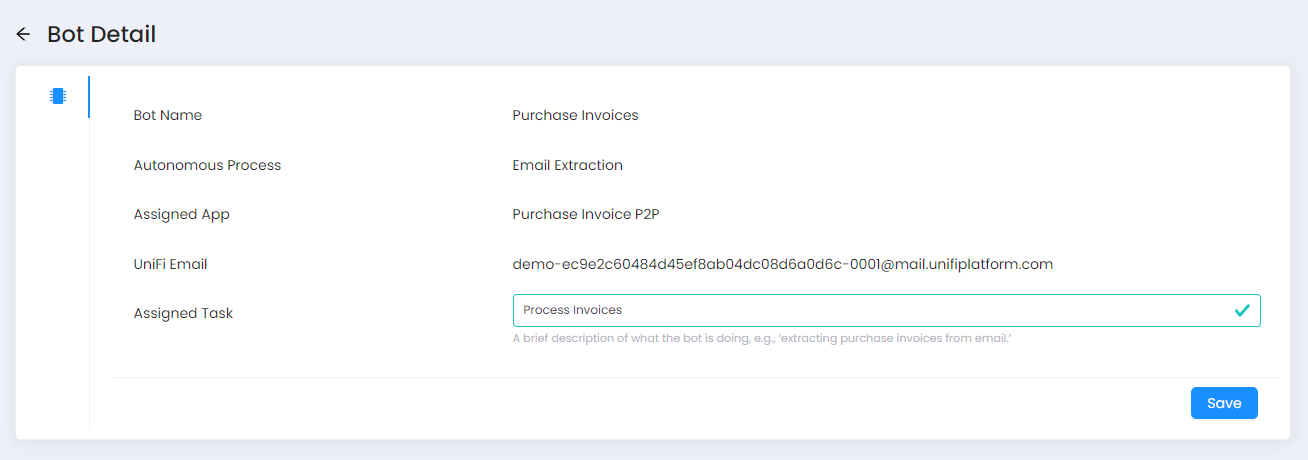
After adding a new bot, the following information is required:
-
Bot Name - A name to help identify the bot, e.g. 'Purchase Invoices'.
-
Autonomous Process - This will be 'Email Extraction'.
-
Assigned App - This field become available when email extraction is selected as the process. Select the app that that the email attachments will initiate and begin the document analysis.
-
UniFi Email - This is generated automatically when the bot is created, any emails sent to the assigned address will be monitored and the attachments read.
-
Assigned Task - Some descriptive text to help users understand what the bot is doing.

If you prefer your customers to email to an address within your companies email domain, you can do this and set up a rule within your email system to automatically forward to the UniFi platform address. This also has the advantage that you can retain a copy of all documents received within your network as well as there being one within the UniFi platform.
Once created a bot can be stopped and re-started using the action option on the far right of the main bot screen.
Scheduler
This bot allows tasks to be scheduled using the UniFi scheduler tool. Once the bot has been assigned to an app, you can create as many scheduled tasks as required for that app. This bot just requires a name (free text), the autonomous process of 'Scheduler' and the app it is being assigned to:

Once this is done, you can go to the app editor to create the schedules.
Machine learning
This allows the use of machine learning services within the app process. Currently this is used to improve the accuracy of OCR and can be used in conjunction with the 'Email Extraction' bot as described above to automatically monitor an email address and OCR and submit documents received. In future this will be added to other parts of the app process. Once assigned to an app the service is available to be used in the app details section. The options of autonomous processes are split into two sections - those described as 'Default' are using UniFi built-in machine learning service, however there are also some additional options from OpenAI which may provide better results in some circumstances. The options are:
-
Default/OpenAI - Invoice and Receipt - Optimised for recognising invoices and receipts based on learning a large data set.
-
Default/OpenAI - Identity - Optimised for identity documents such as passports and drivers licences.
-
Default - Form Data - For more generic documents not specified above.
-
Default - Table Data - For generic data provided in a tabular format.
Select the most appropriate option for the app you want to add OCR to and it will then be available to use in the app details.
